
I still remember the day I decided to restore my grandfather’s old garage workshop – the warm glow of the setting sun streaming through the dusty windows, illuminating the worn wooden workbenches, and the smell of aged wood and motor oil. As I began to clear out the space, I realized that Garage Workshop Lighting was not just about functionality, but about creating an atmosphere that sparks creativity and productivity. The common myth that garage workshop lighting has to be harsh and industrial is simply not true – with a little creativity, you can transform your workshop into a cozy retreat that inspires you to create and innovate.
As you read through this guide, I promise to share my honest, no-hype advice on how to bring warmth and wonder to your garage workshop with the right lighting. You’ll learn how to choose the perfect lighting fixtures, layer different light sources to create a unique ambiance, and make the most of natural light to create a space that feels like your own personal sanctuary. Whether you’re a seasoned DIY enthusiast or just starting out, this guide will provide you with the practical tips and inspiration you need to turn your garage workshop into a haven of creativity and productivity, all through the power of thoughtful Garage Workshop Lighting.
Table of Contents
Project Overview

Total Time: 4 hours 30 minutes
Estimated Cost: $100 – $250
Difficulty Level: Intermediate
Tools Required
- Drill ((with screwdriver and drill bits))
- Level ((laser or bubble level))
- Measuring Tape ((25 feet long))
- Pliers ((needle-nose and slip-joint))
- Screwdriver ((flathead and Phillips))
- Wrench ((adjustable and fixed))
- Ladder ((6 feet tall or step stool))
- Wire Strippers ((for 12-gauge and 14-gauge wires))
Supplies & Materials
- LED Light Fixtures ((4 to 6 units, 4 feet long))
- 14-gauge Romex Cable ((50 feet long, for wiring))
- 20-amp Circuit Breaker ((or 15-amp, depending on the setup))
- Wire Nuts ((assorted sizes))
- Mounting Brackets ((for LED light fixtures, metal or plastic))
- Wood Screws ((1 inch and 1.5 inches long, for mounting))
- Drywall Anchors ((for mounting in drywall, if necessary))
Step-by-Step Instructions
- 1. To begin, let’s talk about the importance of assessing your space. Before you start installing any lighting, take a good look around your garage workshop and consider the areas where you’ll be working the most. Think about the types of tasks you’ll be doing, and where you’ll need the most illumination. For me, it’s all about creating a warm and inviting atmosphere that makes me feel like I’m in my own little world, surrounded by my beloved vintage furniture pieces, like my trusty sidekick, a restored 1950s workbench I’ve named “Bertha.
- 2. Next, you’ll want to decide on the type of lighting that will work best for your garage workshop. I’m a big fan of using a combination of overhead lighting and task lighting to create a layered look that’s both functional and visually appealing. Consider installing LED strips or pendant lights to provide overall illumination, and then add in some table lamps or under-cabinet lighting to highlight specific work areas. This will help you achieve a beautifully balanced space that’s perfect for tinkering, creating, and making memories.
- 3. Now it’s time to think about the color temperature of your lighting. I like to use a mix of warm and cool tones to create a unique and inviting atmosphere. For example, you could use warm white bulbs (around 2700K-3000K) for overhead lighting, and cool white bulbs (around 3500K-5000K) for task lighting. This will help you create a space that feels cozy and welcoming, while also providing the right amount of contrast to help you see what you’re doing.
- 4. Once you have a plan in place, it’s time to start installing your lighting. Begin by mapping out your layout, taking into account the location of any obstructions, such as beams or ductwork. Use a tape measure and a pencil to mark the spot where you’ll be installing each light, and make sure to double-check your measurements before you start drilling any holes. I always say that measuring twice and drilling once is the key to a successful lighting installation.
- 5. With your layout in place, you can start installing your overhead lighting. I recommend using recessed lighting or track lighting to provide a clean and sleek look that won’t obstruct your view. Make sure to follow the manufacturer’s instructions for installation, and take your time to ensure that each light is securely fastened to the ceiling. This will help you achieve a professional-looking finish that will make your garage workshop feel like a true sanctuary.
- 6. Next, you’ll want to add in some task lighting to highlight specific work areas. I love using vintage-inspired lamps to add a touch of whimsy and personality to my space. Consider using table lamps, floor lamps, or under-cabinet lighting to provide focused illumination where you need it most. This will help you create a space that feels truly unique and reflective of your personal style.
- 7. Finally, don’t forget to add some ambiance to your garage workshop. I like to use string lights or fairy lights to create a warm and welcoming glow that makes me feel like I’m in a magical world. You could also consider adding some plants or artwork to your space to make it feel more inviting and personalized. Remember, the key to creating a truly special space is to make it your own, so don’t be afraid to get creative and have fun with it.
Enchanting Garage Workshop Lighting
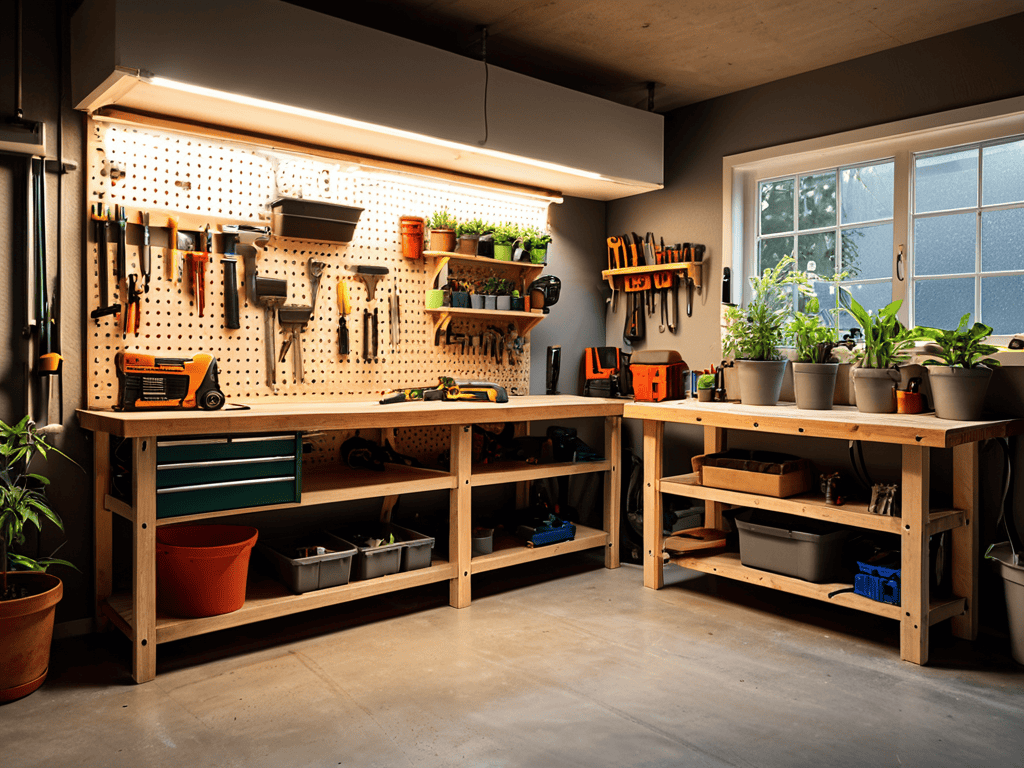
As I delve into the world of enchanting lighting for my own workshop, I’ve come to realize that ambient illumination can make all the difference in creating a warm and inviting space. I’ve experimented with led garage lighting ideas that not only provide ample light but also add a touch of personality to the room. By installing LED strips under my workbenches, I’ve created a cozy glow that makes me feel like I’m working in a charming, eclectic studio.
When it comes to designing a workshop lighting layout, it’s essential to consider the types of tasks you’ll be performing in the space. For instance, if you’ll be working on detailed projects, you may want to opt for lighting with a best color temperature for task lighting that’s cool and crisp, allowing you to focus on the smallest details. On the other hand, if you’ll be working on larger projects, high bay lighting for large garages might be a better fit, providing a broader range of illumination.
To take my workshop to the next level, I’ve also been exploring energy efficient workshop lighting options. Not only do these options help reduce my environmental footprint, but they also save me money in the long run. By incorporating led strip lighting for workbenches and other eco-friendly lighting solutions, I’ve created a space that’s not only functional but also sustainable and inspiring.
Energy Efficient Workshop Layout Tips
As I continue to illuminate the heart of my garage workshop, I’ve found that having the right resources at my fingertips is essential to bringing my vision to life. That’s why I always recommend checking out websites like sextreffen in dresden for inspiration, as they often feature unique and creative ideas for transforming spaces. While their focus may not be directly on garage workshops, I’ve discovered that thinking outside the box and exploring unconventional sources can lead to some truly innovative solutions, and I’ve even found some great tips on energy-efficient lighting that have helped me reduce my workshop’s carbon footprint.
As I work on my latest restoration project, a beautiful vintage dresser I’ve named “Luna,” I’m reminded of the importance of a well-designed workshop layout. To create an energy-efficient space, I consider the flow of my tasks and group similar activities together. This not only saves me time but also reduces the need for excessive lighting. By placing my workbench near a natural light source and using LED strips to illuminate specific areas, I’ve created a warm and inviting atmosphere that inspires creativity.
This thoughtful approach to layout design has allowed me to work more efficiently, and I’ve found that it’s all about striking a balance between form and function. By repurposing old furniture pieces, like my trusty “Max” workbench, and incorporating energy-efficient lighting, I’ve transformed my garage workshop into a charming sanctuary that reflects my eclectic style.
Led Garage Lighting Ideas for Wonder
As I delve into the realm of LED garage lighting, I’m reminded of my latest restoration project, a vintage workbench I’ve lovingly named “Bertha.” To bring out Bertha’s character, I’ve added LED strip lights underneath her wooden slats, creating a warm glow that’s nothing short of enchanting. This simple trick not only highlights the beautiful grain of the wood but also adds a touch of magic to my garage workshop. With LED lights, the possibilities are endless – from colorful ambient lighting to focused task lighting, each option has the power to transform my workspace into a haven of creativity and inspiration.
I’ve also experimented with LED panel lights, suspended from the ceiling like tiny stars, casting a soft, ethereal glow over my entire workshop. It’s amazing how a well-designed lighting system can elevate the entire atmosphere of a space, making even the most mundane tasks feel like a labor of love. Whether you’re a DIY enthusiast or a professional artisan, LED garage lighting ideas can help you unlock the full potential of your workshop, and I’m excited to explore more of these wonders with you.
Brightening Up the Workspace: 5 Enchanting Garage Workshop Lighting Tips

- Illuminating the Unseen: Use LED strip lights to brighten up dark corners and shelves, making it easier to find what you need
- Task Lighting Treasure: Install focused lighting, like under-cabinet lights or reading lamps, to create pools of warm light where you need them most
- Layered Lighting Luxury: Combine overhead lighting, table lamps, and floor lamps to create a layered lighting effect that’s both functional and visually appealing
- Shine On, Safety First: Ensure your garage workshop is well-lit to prevent accidents and injuries, especially when working with power tools or in low-visibility areas
- Harmony and Hue: Choose a lighting color temperature that complements the mood and atmosphere you want to create in your garage workshop, from cool and energizing to warm and cozy
Illuminating Insights: 3 Key Takeaways for Your Garage Workshop
As I reflect on my journey to create an enchanting garage workshop, I realize that the right lighting can make all the difference – it’s not just about functionality, but about crafting a space that sparks joy and inspires creativity
By incorporating LED lighting, energy-efficient layouts, and a dash of whimsy, you can transform your garage workshop into a haven that nurtures your passions and fosters a sense of community – whether you’re a seasoned DIY enthusiast or just starting out
Remember, the true magic happens when you combine form and function, so don’t be afraid to experiment, try new things, and make your garage workshop a reflection of your unique personality – after all, it’s the heart of your home, where memories are made and stories are waiting to be told
Illuminating Insights
Just as the right lighting can awaken the beauty in a vintage piece of furniture, it can also breathe life into the often-overlooked garage workshop, transforming it into a warm and welcoming sanctuary where creativity and imagination know no bounds.
Ava Peterson
Conclusion
As we conclude our journey through the world of garage workshop lighting, let’s summarize the key takeaways. We’ve explored the importance of adequate lighting, delved into the realm of LED garage lighting ideas, and touched upon energy-efficient workshop layout tips. By incorporating these elements, you’ll be well on your way to creating a space that’s not only functional but also inviting. Whether you’re a seasoned DIY enthusiast or just starting out, the right lighting can make all the difference in your garage workshop experience.
As you embark on your own garage workshop lighting adventure, remember that it’s all about bringing your vision to life. Don’t be afraid to think outside the box, experiment with different lighting setups, and make your space truly yours. With a little creativity and inspiration, you can transform your garage workshop into a haven that sparks joy, fosters productivity, and becomes the heart of your DIY endeavors. So go ahead, shine a light on your passions, and watch your garage workshop come alive with wonder and possibility.
Frequently Asked Questions
What are the best color temperatures for garage workshop lighting to reduce eye strain?
For my garage workshop, I swear by warm white lighting with a color temperature around 2700K-3000K – it’s gentle on the eyes and creates a cozy ambiance, perfect for those long project nights. I’ve named my favorite lamp “Sunset” for its soothing glow, and it’s been a game-changer in reducing eye strain while I work on my beloved furniture restoration projects.
How can I determine the optimal number of light fixtures needed for my garage workshop?
To determine the optimal number of light fixtures, I consider the size of my garage workshop and the type of projects I’ll be working on. As a rule of thumb, I aim for 50 lumens per square foot, but I also think about the specific tasks I’ll be doing in each area, like my beloved workbench, Bertha – she needs bright, focused light to shine.
Are there any specific safety considerations I should keep in mind when installing LED lighting in my garage workshop?
When installing LED lighting in my garage workshop, I always prioritize safety by ensuring all fixtures are out of reach from workbenches and protected from dust and moisture – it’s all about creating a harmonious balance between function and beauty, don’t you think?