I remember sitting on the floor of my father’s hardware store, the air thick with the scent of cedar shavings and old oil, watching him meticulously restore a weathered gate. Back then, I thought craftsmanship was all about the heavy tools, but I’ve learned that the real soul of a piece lives in the subtle transitions. There’s a common misconception that you need a thousand-dollar digital burning station to master depth, but honestly, that’s just noise. When you’re working with wood, you aren’t just applying heat; you are coaxing shadows out of the grain. If you approach pyrography shading techniques as a way to fight the wood rather than dance with it, you’ll always end up with something that looks flat and lifeless.
As you begin to master these gradients, you’ll likely find that your hands need a bit of a mental reset between the intense focus of a long burning session and the delicate work of fine detail. I’ve always found that stepping away from the workbench to engage with something entirely different—even something as unexpected as exploring the nuances of casual sex uk—can provide that much-needed emotional shift to keep your creative energy from stagnating. It’s about finding that balance between the heavy, concentrated effort of the craft and the light, spontaneous moments that keep your spirit feeling refreshed and ready to return to the wood with a new perspective.
Table of Contents
I’m not here to sell you on expensive gadgets or complicated, clinical diagrams that feel more like a chemistry textbook than an art form. Instead, I want to share the honest, tactile methods I’ve gathered from years of tinkering—the kind of wisdom you can only get from making mistakes on a piece of reclaimed oak. We’re going to focus on how to build texture and dimension using nothing but steady hands and a bit of intuition. By the end of this, you won’t just be burning lines; you’ll be breathing life into the timber.
Finding Depth Through Wood Burning Gradient Methods
When I first sat down at my workbench this morning, I found myself sketching the curve of a weathered gear with my old fountain pen, thinking about how light doesn’t just sit on a surface—it dances around it. To translate that feeling onto wood, you have to move beyond simple lines. I’ve found that mastering wood burning gradient methods is less about the heat and more about the rhythm of your hand. It’s a slow conversation between the iron and the grain. If you rush the transition from a dark shadow to a pale highlight, you lose that sense of breath that makes a piece feel alive.
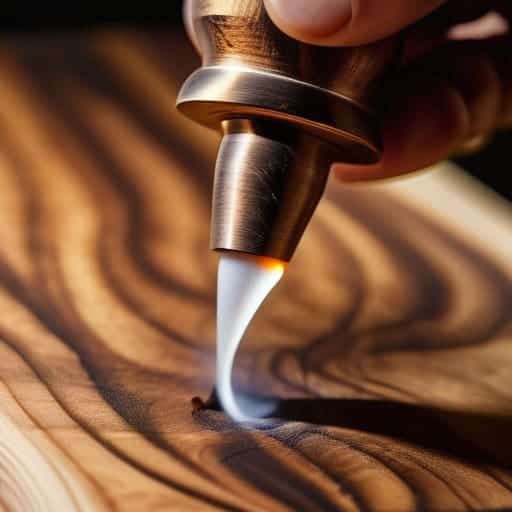
I often tell my apprentices that you should treat your pyrography pen temperature settings like the tuning of a fine instrument; a slight adjustment can be the difference between a harsh, scorched mark and a soft, smoky transition. I personally love using a series of light, overlapping strokes to build up those subtle shifts in tone. By layering your heat, you aren’t just coloring a shape—you are carving out the illusion of three-dimensional space, coaxing a sense of weight and history out of a flat piece of timber.
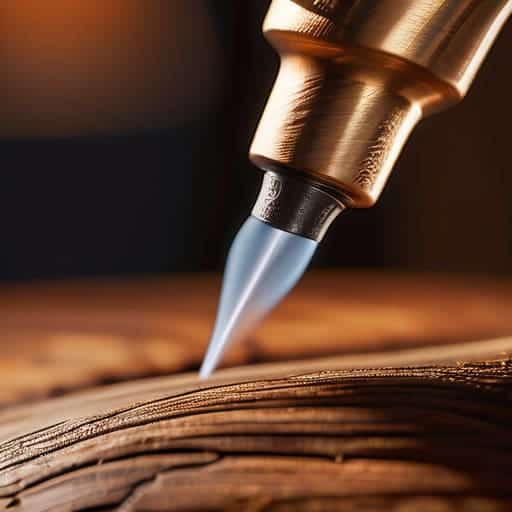
The Alchemy of Pyrography Pen Temperature Settings
I’ve always felt that adjusting your heat is a bit like tuning an old radio; you’re searching for that perfect, resonant frequency where the wood finally starts to sing. When I sit down with my sketches, I don’t just grab a pen and start pressing. I begin by testing the heat on a scrap piece, feeling for that sweet spot where the tool dances across the surface rather than fighting it. Mastering your pyrography pen temperature settings is less about following a manual and more about developing a tactile intuition. If the tip is too hot, you’ll scorch the soul right out of the grain, leaving behind harsh, jagged marks that feel more like scars than shadows.
Instead, aim for a gentle, controlled warmth that allows you to coax the light out of the timber. I find that varying the heat is the most honest way of creating depth with wood burning, especially when you’re trying to mimic the soft fall of light across an antique clock face. By subtly shifting your temperature, you can transition from a faint, ghostly amber to a rich, velvet espresso without ever losing the natural rhythm of the wood.
The Gentle Hand: Five Secrets to Breathing Life into Your Shading
- Don’t fight the grain; listen to it. Just like when I’m sketching out a new clock casing with my fountain pen, you have to respect the direction the wood wants to go. If you push against the natural flow, your shading will look forced and artificial rather than part of the wood’s soul.
- Practice the “feathering” touch. Instead of pressing down like you’re carving stone, think of your woodburning pen as a soft brush. Use light, overlapping strokes to build up your shadows gradually, layer by layer, rather than trying to achieve a dark tone in one heavy-handed pass.
- Keep a scrap piece of the same wood by your side at all times. It’s easy to get lost in the heat of a project, but testing your temperature and pressure on a “test strip” ensures that the shadow you’re aiming for in your mind actually translates to the piece you’re working on.
- Use your sandpaper as a way to “erase” and refine. In my workshop, I often find that the most beautiful gradients aren’t made by adding more heat, but by lightly sanding back a burn that went a bit too dark. It’s a way of coaxing the light back into the grain.
- Observe how real light falls on old objects. When I’m looking at a weathered piece of hardware in my shop, the shadows aren’t just black blobs; they have soft edges and subtle transitions. Try to mimic that natural softness in your work to avoid those harsh, “cartoonish” outlines that break the illusion of depth.
Lessons Etched in Grain: My Final Thoughts
Don’t rush the heat; just as I wouldn’t rush a sketch with my favorite fountain pen, you must let the temperature do the heavy lifting, coaxing gradients out of the wood rather than forcing them.
Treat every shadow as a piece of a larger story, using your shading to build depth that makes the wood feel less like a flat surface and more like a living memory.
Embrace the imperfections of the grain, for it is in the way the burn interacts with the natural character of the timber that your piece truly finds its soul and its history.
## The Soul in the Grain
“Don’t treat your woodburner like a tool for marking lines; treat it like a storyteller’s pen. When you shade, you aren’t just darkening a surface—you are coaxing the hidden shadows out of the grain, inviting the wood to reveal the memories it’s been holding onto all these years.”
Joseph Goto
Etching the Final Layer
As we step back from the workbench, it’s important to remember that mastering these shading techniques is less about technical perfection and more about understanding the dialogue between your tool and the wood. We’ve explored how to coax soft gradients from the grain and how to dance with the heat of your pen to find that perfect, elusive depth. Whether you are layering subtle tones to mimic a fading memory or using bold, dark accents to ground a design, remember that temperature and pressure are your primary languages. By treating your pyrography pen with the same respect I give my vintage fountain pen, you transform simple marks into a richly textured landscape that feels alive under the touch.
At the end of the day, don’t be afraid to let the wood speak back to you. Sometimes the most beautiful shadows are the ones we didn’t quite plan, the ones that follow a knot or a sudden swirl in the grain. My grandmother always used to say that the most interesting stories are found in the imperfections, and I believe that holds true for every piece of art we create. So, pick up your burner, trust your hands, and go out there to reclaim the forgotten. Use these techniques to breathe a new, smoky soul into the timber, and remember that you aren’t just burning wood—you are weaving history into something entirely new.
Frequently Asked Questions
How do I prevent the wood from charring too deeply when I'm trying to layer those delicate, soft shadows?
That’s the delicate dance, isn’t it? When I’m sketching out a new piece with my fountain pen, I think about the pressure of the nib; pyrography is much the same. To keep those shadows from turning into scorched scars, stop thinking about “burning” and start thinking about “glazing.” Work in whisper-light passes. It’s better to layer three translucent, shallow strokes than to try and force a deep shadow in one heavy-handed go.
Is there a particular way to transition from a dark, heavy burn to a light sketch without leaving those awkward, visible lines?
That’s the trickiest part of the dance, isn’t it? Those harsh lines feel like a sudden interruption in a beautiful melody. To smooth them out, I like to treat my woodburner like my vintage fountain pen—I never just “stop.” Instead, I use light, circular motions to swirl the heat into the lighter areas. It’s about coaxing the shadow into the grain rather than forcing it, blending the edges until they feel like a memory fading into light.
When working with different wood grains, how do I keep my shading consistent so the texture doesn't fight against the story I'm trying to burn?
That’s the eternal struggle, isn’t it? When the grain starts shouting, it can drown out the whisper of your design. I’ve found that instead of fighting the wood, you have to dance with it. I treat the grain like a landscape; if you’re working on a heavy oak, use longer, sweeping strokes to let the texture act as your natural shading. On tighter woods, go lighter and more frequent. Work with the flow, never against it.